Overheat
-
Posts
701 -
Joined
-
Last visited
Content Type
Profiles
Articles
Forums
Events
Everything posted by Overheat
-
Montreal: Le Thread Generale Pour Weeaboo Fighters
Overheat replied to BladeOfJustice7's topic in International
I'm now 100% going to Montreal. I'll be arriving the morning of August 2nd (Thursday) and I'll have to start heading to the airport at 5PM on the 7th (Tuesday). I wasn't able to stay until Wednesday, sadly. See you guys there. Vice should be showing up on that Thursday meet-up as well. -
Worth noting that the proration changes from ~23.5% to ~20.5%, so it gets a bit harder since you change proration levels. But it's a fair point, since the difference isn't that large (surprisingly).
-
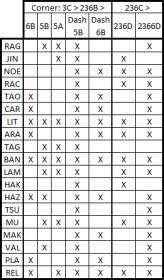
Just a random note, but if you ever get something like 2B > 3C > 236B in the corner, instead of following up with Dashing 5B > 6A > TK, you could do Dashing 5B > 2C > TK instead. (corner) CH 5C[1] > 236C > 214A > 4 > 2C > TK > 5C[2] > 6C > 236D > 214D~C > 214D > 4B[#2 only] > 2DD > TK > 6DD > 2DD > air ender (5990, 68) This combo's really easy, and it's a more practical version of the above combo. Of course, it requires Gravity... So why use this punish combo instead of using 214A for the FC punish? I think you can use this in situations where you're not close enough to use (Dashing) 214A, or where you're not able to do a (Dashing) 214A. Litchi's DP, Arakune's DD reversal, and even Lambda's DD reversal are good examples of this. This might also be easier for some people, as opposed to the FC variant.
-
More or less, yeah. Some of these are just general tips anyway. But I wouldn't exactly treat Mu like Lambda, of course. Before knockdown, I think Lambda is a lot more scary. I also think Lambda can punish better than Mu.
-
This match-up is pretty open in that you can both pushdown and/or space with success. This is about as momentum-based a match-up can get, since Lambda doesn't have any sort of reversal without Heat. At the start of the round, I think the 2 safest options are to either jump away or to backdash. A good offensive option would be to start the round with 3C, hoping for a CH 3C[3] > 236C/236D. - Lambda's 5A hits a crouching Lambda, so it's useful for pressure. - Lambda's also one of the characters that you can do 236C > 236D on, without the need of a Dash (eg. X > 236B > RC > 5DD > 236C > 236D). - You can also do 236B > 5B > 6A without the need of a dash, in the corner. - If the other Lambda doesn't have at least 50 Heat, then you can abuse staggered pressure (delaying gatlings or ending in 5B/2B, usually) to catch mashing. - If Lambda does a far 3C > 236D for oki, you can usually backdash out of it. - If she does a close 3C > 236D for oki (like in the corner), then you can dash and cancel into Barrier out of it sometimes. - If 3C is blocked, and they lead into 236D/214D, you can punish it. If the Lambda does 3C > 236B and you block it, you can do a Dashing 5A to catch her mashing or begin pressure. If you whiff a Drive, Lambda's one of the few characters who has the range to punish it. I don't recommend using 4D from full-screen in this match-up since it has minimal reward, too much recovery, and is easy to react to. If trying to approach Lambda, running and cancelling into Barrier is an effective and safe method of closing in. Running and cancelling into 2A or 2B also can low-profile Lambda's j.2D. 5D can cancel out 214D and 214D~C. You can super flash buffer your own reversal if the opposing Lambda does 632146D. Your backdash and air backdash can be caught by 632146D if mistimed, so be careful if you're trying to bait it. If a Lambda does a random 236236D, you can super flash buffer 236236D as well, with some, if not all, hits cancelling each other out. Or, if you're already in a good position (which means the other Lambda did a really bad 236236D), you usually can dash or air dash and punish her Legacy Edge in the blind-spot. If you can't do either, then just jump and block. If you have to Burst at Lambda's air ender, then you have two options. (1.) Burst at something like 6DD > 2DD > (burst) > j.DD whiff. (2.) Burst at something like dj.DD > dj.2DD > (burst) > dj.632146D whiff. The first is kinda hard to do, and doesn't always work. For the second option, make sure you burst a bit pre-emptively, so it's not too late. If you're the offensive player in option (2.), then you can do dj.DD > dj.2DD > RC > dj.DD > dj.2DD to bait and punish the burst. It's better if you have 100 Heat for the DD ender, of course. Having to burst against Lambda is a very bad position to be in... A lot of these points are also applicable to most of Lambda's match-ups. A few good reads by any player will usually win them the round. It can be a frustrating match-up at times, but that also means you can frustrate the other player too.
-
Central Hachiouji 3 on 3: Purotosu vs Sakomoto Ryouma (Ragna) and Satsuno (Taokaka) Purotosu vs Dango (Noel) Purotosu vs Chibaken (Hakumen) and Rocha (Hazama) Purotosu vs Hiyoko (Arakune) Purotosu doing some new and crazy stuff. Insane (AA) 2DD > 4B hitconfirms, j.D CH > (Dashing) 5DD > 236C confirms, and just very solid play overall. He's still delaying Lambda's Drive beautifully. He's fond of ending Lambda's air ender early, and doing 214D(~C) or 214B after to keep the opponent immobile (depending on positioning). He has a weird corner set-up with X > 236C > Dashing 214A. I think it's something worth playing around with. He's definitely one of the best Lambda's out there.
-
Yeah, I'm still on the west coast. I'll try to think about it and add stuff to it.
-
I play Lambda mirrors all the time, and it's also my favourite match-up lol. But I don't netplay anymore, and even if I did, my internet connection sucks =/
-
Well, Litchi's a tricky one. Sometimes you'll have to walk back a bit after blocking the first part of her DP, then do the CH 5D > 236236D trick. It also helps that you can delay a bit. Really, the burst punish is just to do CH 5D > 236236D, with the opponent bursting before 236236D comes out. The other ways you could bait the burst in this case would be CH 5D > 236A, or you could even just do CH 5D and wait for the opponent to burst. If you have the Heat, I think you should just go for CH 5D > 236C, or CH 5D > 236236D if you think they're going to burst. Both are good options.
-
Gold Bursts (named for the colour) have a P2 of 110%. Basically, it adds more damage.
-
Legacy Edge, with only 8 hits connecting? How would that work? I'm not sure I understand how that'd help her damage. I was thinking of using Lambda's Counter Assault in a combo, just cuz (against Litchi) during 236236D.
-
When I was stuck thinking that Lambda's key to max damage was Spike Chaser, I decided to take it to the extreme and test it out. GC > 214D~C > 214D > Gold Burst > 214D > RC > 214D > Gold Burst > 214D > RC > 214D > Dashing 214A > 236C > Dashing 5C[1] > 6C > 236D > 214D~C > 214D > 6C > 214D > 4B[#2 only] > 2DD > TK > 6DD > 2DD > air DD ender It only gets ~9.6K though I did a much easier version, with only 50 Heat and 1 Gold Burst needed, in CS2, and it did 9.2K.
-
Here's a fun CH 2C combo, midscreen to corner. Thanks to AchedSphinx for the idea of using a FC 214A as Lambda's starter for max damage. I tried quite a few weird things, but those different starters couldn't get more damaging than FC 214A. FC 214A > Gold Burst x 2 > 236C > 4B[2] > 632146D > 6C > 236D > 214D~C > 214D > 632146D > 6B > 2C > TK > 2C > TK > 6A > TK > 3C > 214A > 6DD > 2DD > air DD ender
-
I also think this should be put somewhere, if there's space. (credit to Emjay)
-
Yeah, 236C > 236D doesn't work unless it's midscreen, or from midscreen to corner. You also need the height, which simply isn't possible sometimes. Delaying Drive is a really worthwhile thing to learn for most of Lambda's combo's.
-
If you're opting for 632146D > 5C[1] > 6C, then we can assume it's an FC. Why not FC 632146D > 5C[1] > 6C > 236D > 214D~C > 236C > Dashing 4B[#2 only] > 2DD > TK > 6DD > 2DD > air ender (unless you accidentally omitted the 236C)? Since FC 632146D > Dashing 5C can work, I can't see why a Dashing 214A wouldn't. The only problem would be that it's kinda hard to do. You could try a Dashing 3C > 214A instead. Another thing to try out is FC 632146D > 5DD > 236C > Dashing 5C[8] > 4B[#2 only] > 2DD > air ender. Not too hard, with a pretty decent reward.
-
For the second combo, yes, the proration's good enough for the TK > 6DD > 2DD > air ender. But it's way too hard to be practical in a match, IMO. It's just there to show that it's possible. If I drop a corner combo, it's usually at the TK > 6DD. I've lately been doing a lot of 5C[8] > 4B[#2 only] > 2DD > air ender as an easier alternative. Online finds a way to screw up almost everything, so I guess that's another case where you'd usually opt for an easier alternative.
-
To each his own. It also helps that I play against a lot of characters where I don't have to do the Dash for 236D. I'm confident that you could pull off something like this, Ached: (midscreen) 5DD > 236B > RC > 5DD > 236C > 236D > Dashing 214D~C > 5C[8] > 4B[#2 only] > 2DD > air ender - something to play around with. I'm not sure how it fares against other non-Gravity, meterless, 5DD > 236B > RC combo's. (midscreen to corner) 5DD > 236B > RC > 5DD > 236C > 236D > Dashing 214D~C > 214D > 5C[1] > 6C > 214D > 4B[#2 only] > 2DD > TK > 6DD > 2DD > air ender - I recommend just going for 4B[#2 only] > 2DD > air ender in these cases. The proration is just too low to risk such a difficult link. (mid-screen to corner) 5DD > 236B > RC > 5DD > 236C > 236D > Dashing 214D~C > 5C[1] > 6C > 214D > 4B[#2 only] > 2DD > TK > 6DD > 2DD > air ender - an example of a toned down version that still does respectable damage. - most of the combo's that I post are optimal, or very close to it. If you try a combo and find it too hard, just tone it down a level.
-
Fixed. I meant a Dashing 236D for characters that need it. The Dashing 236D is necessary for Ragna, of course. I'd assume that one could do a Dashing 236D for other characters that it works on, although it just makes some combo's unnecessarily harder IMO.
-
(midscreen) (anti-air) 2DD > 6C > 236236D > 236D~C > 214D > 236C > Dashing 5C[8] > 4B[#2 only] > 2DD > air ender - if you get into the corner, 5C[8] > 6C > 6DD > 2DD > air ender is fine for now. (midscreen to corner) 5DD > 236236D > Dashing 236D > Dashing 214D~C > 6C > 236C > Dashing 4B[#2 only] > 2DD > TK > 6DD > 2DD > air ender - the 6C > 236C > Dashing 4B[#2 only] happens when you're very near the corner. When you're doing the Dashing 4B[#2 only], you're actually running out of the corner and doing 4B (since 236C leaves Lambda in the corner when she does 236C in corner combo's) Just some more damaging combo's that are a bit harder. Another note about 236236D combo's is that you can do 236236D > (Dashing) 236D~C, or you can do a Dashing 236D, with the Dashing being optional for 236D~C (when you're midscreen). I recommend using Dashing 236D~C for now.
-
There are more examples, but I think these are the more practical, sensible ones. (1.) 5D CH > 236236D (2.) 5DD > 236236D (3.) (anti-air) 2DD > 6C > 236236D (eg. Throw > Dashing 2DD > 6C > 236236D) (4.) CH 2C > 6C > 236236D The combo's can be improved. Let me know if you want better combo's, although they'll be a bit harder.
-
Yeah, that should work. You could do something like (Lambda is in the corner) 3C > 214A > (cross-under) Dashing 6A > TK > 5C > 6C > 236D > etc. For 236D cross-throughs, you could do (Lambda is in the corner) CH 3C[3] > 236D > (cross-through) Dashing 236A > Dashing 6C > 236C > 5C[1] > 6C > 214D > 4B[#2 only] > 2DD > TK > 6DD > 2DD > air ender. I think both are good, and are just a matter of personal preference. The only hard part about Nedel's combo is hit-confirming the height and the CH. I think one could use Nedel's combo against a very obvious jump-in. Someonewhodied's combo is good as well, with (IMO) the only difficult parts being the 214A > 236C link and the Dashing 236D, if it's necessary. You could improve it to AA CH 6A > Dashing 3C > 214A > 236C > (Dashing) 236D > Dashing 214D~C > 214D > (5C[1]) > 6C > 214D > 4B[#2 only] > 2DD > TK > 6DD > 2DD > air ender
-
At the beginning of the round, you can't do this combo. IMO, a CH 5C[1] > 236C combo, with a full corner combo, is too hard to do in a match. Nedel already posted an easier version of this. I've already tried doing CH 5C[1] > 236C combo's from mid-screen to corner, which is the best positioning, IMO. The difference isn't that big. Yes, you can learn two different combo's that are very similar in terms of damage and Heat Gain. It's all personal preference, IMO.
-
Lambda can get 5.5K to just under 6K, meterless, from CH 5C[1] punish combo's that are from midscreen to the corner, or that start with the opponent in the corner. For simplicity, we can narrow it down to one combo and work with that. (midscreen to corner) CH 5C[1] > 236C > Dashing 6B > 2C > TK > 5C[2] > 6C > 236D > 214D~C > 214D > 4B[#2 only] > 2DD > TK > 6DD > 2DD > air ender (5902, 69) It may be possible to omit the 6B. That should bump up the damage a bit. The combo is basically the same if it starts in the corner, too. Instead of doing a Dashing 6B, though, you have to back away a bit. By backing away a bit, you can create the distance needed for 236D to connect. We can infer that we have 4 or more frames to back away, since 5C[1] CH > 236C > 2C connects. 2C has a start-up of 14 frames, and 6B has a start-up of 10 frames. It's a bit hard to do, and it probably won't be able to create the distance necessary for 236D against some characters. In these cases, you can use 5B instead, since it has 8 frames of start-up. It should make the combo easier, and work on more, if not all, characters. It'll do 5.5K, with ~68 Heat gain. For someonewhodied:
-
Some of my thoughts and, hopefully new, ideas to this thread. Remember, the less Drive and 5C hits that you use in your combo's, the more damage potential there is. If it's possible to omit them, then it's usually worth it. My reasoning is that both Drive and 5C don't do enough damage to justify using them to offset their mediocre proration. With that being said, using Drive and 5C certainly can make things easier, but it's just a matter of how comfortable you are in omitting them partially, or completely, whenever possible. Some examples (a nice balance between moderately challenging and damaging or rewarding, IMO): For all the combo's I listed, you can slightly edit it to your discretion. Ending in oki, or in the standard air ender might require a bit of modification. As an example, sometimes the X > 2DD > TK > 6DD > 2DD > air ender might be hard to connect. You can just do X > 2DD > air ender instead. I know I wrote down a lot, but besides being mostly practical and fairly rewarding combo's, I hope you can start implementing some new things that you might not have known before.