chzchan
-
Posts
1,063 -
Joined
-
Last visited
Content Type
Profiles
Articles
Forums
Events
Everything posted by chzchan
-
Yeah, have things prepared for every situation. Just getting in that extra bit of damage if you judge your opponent's health amount correctly can be the difference between a win and a loss, especially if your opponent doesn't have their burst.
-
It is not a waste of meter. Trust me. You can kill off of this. I have stolen rounds using this since using 50 meter on this super gets you so much more reward than RCing a C or D DP. You can bump up the 1.5k that this move does raw to 3.5k with 1 charge which is such a huge difference. 214B will not work since 236236C is an S starter. Even though it is an S starter, it is one of the few that has a P1 of 100 which means each hit after the initial will do a ton of damage. The combos are: [1 Charge + 50%] 236236C > 2366D > 5C(dash)2CC > sj.C > dj.CC > j.214B SK [3576 DM] [?% HG] [1 Charge + 50%] 236236C > 2366D > 5CC(dash) > 623C > j.236A > j.214A HK [3257 DM] [?% HG] This is even easier to do in CF thanks to the changes to 236D's knockback and S starter hitsun decay.
-
It still works off grounded just fine. Just gotta dash for a bit longer and time the 2B/2A to be a bit later.
-
Fuzzy guard setup off of followup hammer in the works. You can do it out of either a standing combo as a reset or out of pressure using a charge for hammer. If you RC the followup 22B and the opponent doesn't block it you can pick up with 2A into a simple air combo. If you RC 22D you cna pick up with whatever you want lol.
-
I have noticed that sometimes the 2BB followup does not autocorrect upon sliding under like it used to in 1.1 so don't always just mash 2BB. You may actually have to delay it a bit or you can just do 2A>5C/Command Grab etc.
-
236C. In CF you can just sliding crouch and it works without having to hit 2A or 2B so they may have adjusted her hitbox slightly.
-
More space
-
Space
-
General Notations Used sj - Super Jump dj - Double Jump ad - Air Dash IAD - Instant Air Dash jc - Jump Cancel sj - Super Jump Cancel jcc - Jump Cancel Cancel (Tap 8 then input your next attack as normal) CH - Counter Hit FC - Fatal Counter RC - Rapid Cancel CT - Crush Trigger OD - Overdrive tk - Tiger Knee | | - Hold Input (actually [] but can't be used because of bold shortcut) { } - Delay (w) - Whiff (N) - Can be omitted from the combo. [???] xN - Repeat ??? N amount of times. DM - Damage [HG] - Heat Gain % [x%] - Heat Required [x Charge] - Number of charges / stock / install gauge required or gained Combos 5A/2A Midscreen 5A5CC > 623C > j.236{A} > j.214A > 2A5CC > sj.BB > dj.BCC > j.236A > j.214{A} [2325 DM] [?% HG] [1 Charge] 5A5CC > 236B > 214B > 22D > 3CC > 5CC > sj.BB > dj.BCC > j.236A > j.214{A} [3089 DM] [?% HG] Corner 5A5CC > 623C > j.214{A} > 2A5CC > sj.BB > dj.BCC > j.236A > j.214{A} [2247 DM] [?% HG] [1 Charge] 5A5CC > 236D > j.BCC > j.236A > j.D > j.BB > dj.BCC > j.236A > j.214{A} [2758 DM] [?% HG] [0.5 Charges] Grab Midscreen Grab > 22B > 5C(dash)2CC > sj.BB > dj.BCC > j.236A > j.214{A} [2807 DM] [?% HG] [1 Charge] Grab > 22D > 5C2CC > sj.BB > dj.BCC > j.236A > j.214{A} [3077 DM] [?% HG] Corner Grab > 22B > 5CC > sj.C > j.236A > j.D > j.BB > dj.CC > j.236A > j.214{A} [2752 DM] [?% HG] [0.5 Charges] 5B Midscreen [1 Charge] 5BB5CC(close) > 236B > 214B > 22D > 3CC > 5CC > sj.BB > dj.BCC > j.236A > j.214{A} [3498 DM] [?% HG] [1 Charge] 5BB5CC(far) > 623D > j.214A(w) > 2C > 236B > 214B > 22B > 2A5CC > sj.BC > dj.BC > j.236A > j.214{A} [3598 DM] [?% HG] Corner [1 Charge] 5BB5CC > 236B > 214B > 22D > 5CC > sj.C > j.236A > j.D > j.BB > dj.CC > j.236A > j.214{A} [3238 DM] [?% HG] [0.5 Charges] 5C Midscreen 5CC > 623C > j.236{A}(w) > 5C2CC > sj.BB > dj.BCC > j.236A > j.214{A} [2839 DM] [?% HG] [1 Charge] 5CC > 236B > 214B > 22D > 3CC > 5C2CC > sj.BB > dj.BCC > j.236A > j.214{A} [3817 DM] [?% HG] [1 Charge] 5CC(far) > 623D > j.214A(w) > 2C > 236B > 214B > 22B > 2A5CC > sj.BB > dj.BCC > j.236A > j.214{A} [3944 DM] [?% HG] [1 Charge] 5CC > 236D > 5B(dash) > sj.BBCC > j.236A > j.D > j.B > dj.BCC > j.236A > j.214{A} [3406 DM] [?% HG] [0.5 Charges] Corner 2C Midscreen 2CC(AA) > sj.CC > j.D > j.B > dj.BCC > j.236A > j.214{A} [2753 DM] [?% HG] 2CC(low AA) > j.BB > dj.BB > j.236A > j.214{A} > 2A5CC > sj.BB > dj.BCC > j.236A > j.214{A} [28?? DM] [?% HG] 2CC(high AA) > sj.BB > dj.BCC > j.236A > j.214{A} > 2A5CC > sj.BB > dj.BCC > j.236A > j.214{A} [2949 DM] [?% HG] [1 Charge] 2CC(AA) > sj.BB > j.BCC > j.214D > 3CC > 5CC > sj.BB > dj.BCC > j.236A > j.214{A} [3315 DM] [?% HG] Corner 2CC(AA) > sj.CC > j.236A > j.D > j.BB > dj.BCC > j.236A > j.214{A} [? DM] [?% HG] [1 Charge] 2CC(AA) > j.CC > j.214D > 3CC > 5C2CC > sj.BB > dj.BCC > j.236A > j.214{A} [3524 DM] [?% HG] 6A Midscreen 6A5CC > 214B > 5C2CC > sj.BB > dj.BCC > j.236A > j.214{A} [2997 DM] [?% HG] [1 Charge] 6A5CC > 214D > IAD j.C{C} > 5C2CC > sj.BB > dj.BCC > j.236A > j.214{A} [3499 DM] [?% HG] Corner 22X Midscreen 22B > 2BB2C > 236B > 214B > 22B > 2A5CC > sj.BB > dj.BCC > j.236A > j.214{A} [2684 DM] [?% HG] [1 Charge] 22B > 5B5C2C > 236D > 6C > 214B > 5CC > sj.BB > dj.BCC > j.236A > j.214{A} [3287 DM] [?% HG] [1 Charge] 22B > 5B5C2C > 236D > 6C > j.D > j.C > 5CC > sj.BB > dj.BCC > j.236A > j.214{A} [3340 DM] [?% HG] [0.2 Charge] [1 Charge + 25%] 22B > 5C2C > 214D > jcc{CT} > 6C > 214B > 5CC > sj.BB > dj.BCC > j.236A > j.214{A} [3651 DM] [?% HG] Corner 22B > 5C2CC > dj.CC > j.236A > j.D > j.BB > dj.CC > j.236A > j.214{A} [2881 DM] [?% HG] [0.5 Charge] 2B Midscreen [1 Charge] 2BB5B6BB > 236B > 214B > 22D > 3CC > 5CC > sj.BB > dj.BCC > j.236A > j.214{A} [2932 DM] [?% HG] Corner 6B Midscreen Corner 3C Midscreen 3CC > 5BB2C > 236B > 214B > 22B > 2A5CC > sj.BB > dj.BCC > j.236A > j.214{A} [3096 DM] [?% HG] 3CC > 5C2C > 214B > 5C2CC > sj.BB > dj.BCC > j.236A > j.214{A} [3208 DM] [?% HG] FC 3CC > 5C2C > IAD j.BCC > 2C > j.{B}C > 2CC > sj.BC > dj.BCC > j.236A > j.214{A} [3509 DM] [?% HG] [1 Charge] 3CC > 5B5C2C > 236D > 6C > 214B > 5CC > sj.BB > dj.BCC > j.236A > j.214{A} [3600 DM] [?% HG] [1 Charge + 25%] 3CC > 5C2C > 214D > jcc{CT} > 6C > 214B > 5CC > sj.BB > dj.BCC > j.236A > j.214{A} [3949 DM] [?% HG] Corner

-
You mean just randomly in neutral or in pressure?
-
All of them really end up doing around the same damage and get the same knockdown so they really do whatever they want. Each of the Japanese players have their own habitual air string and launcher string (at least off of an N starter) that they are comfortable with and just kind of stick to it. I am pretty sure that using 3CC is the optimal route but from what I have seen, it barely increases damage.
-
Buffer the dash input during the 5D and it should be possible. It is more of a flashy combo rather than a practical one though.
-
I think 5B hitbox got extended downward some more near the shield area. I'd like to see how it goes up against other normals that have been able to low profile 5B for the longest time as this could just be Kokonoe's hitbox getting nerfed.
-
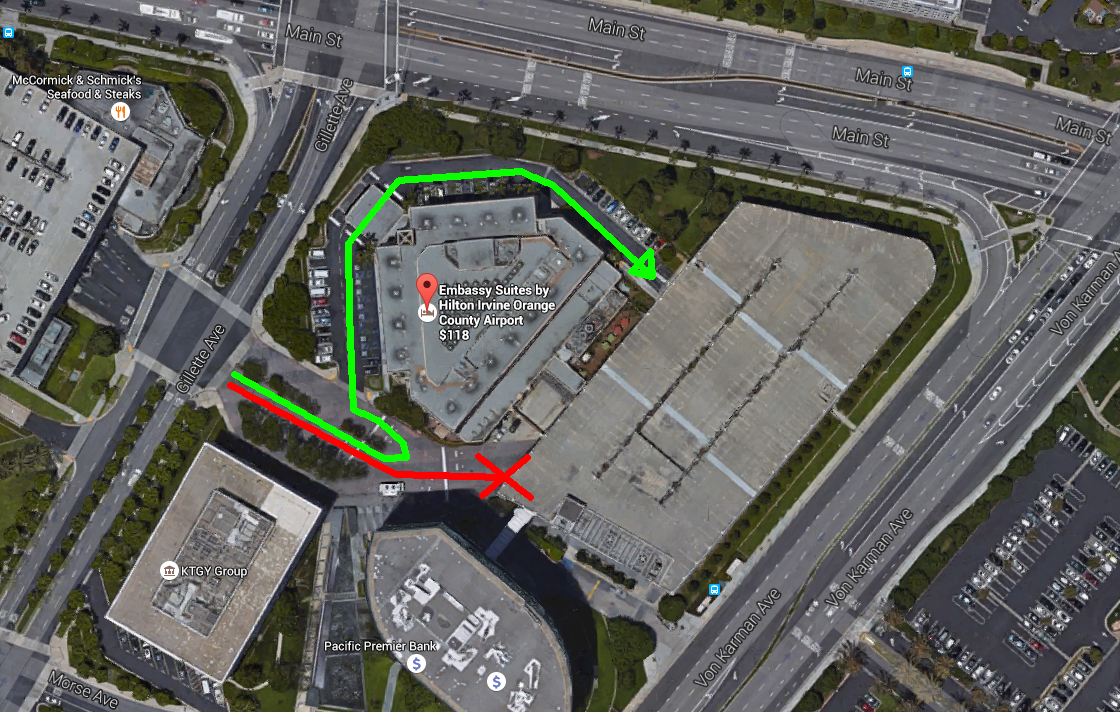
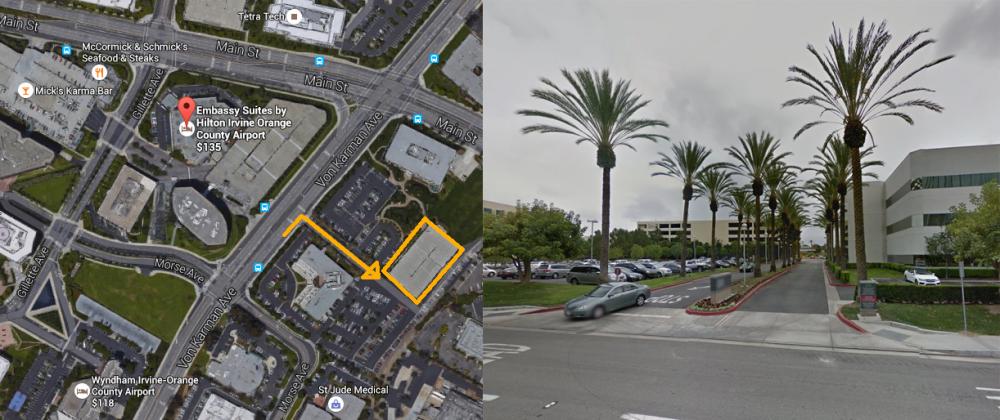
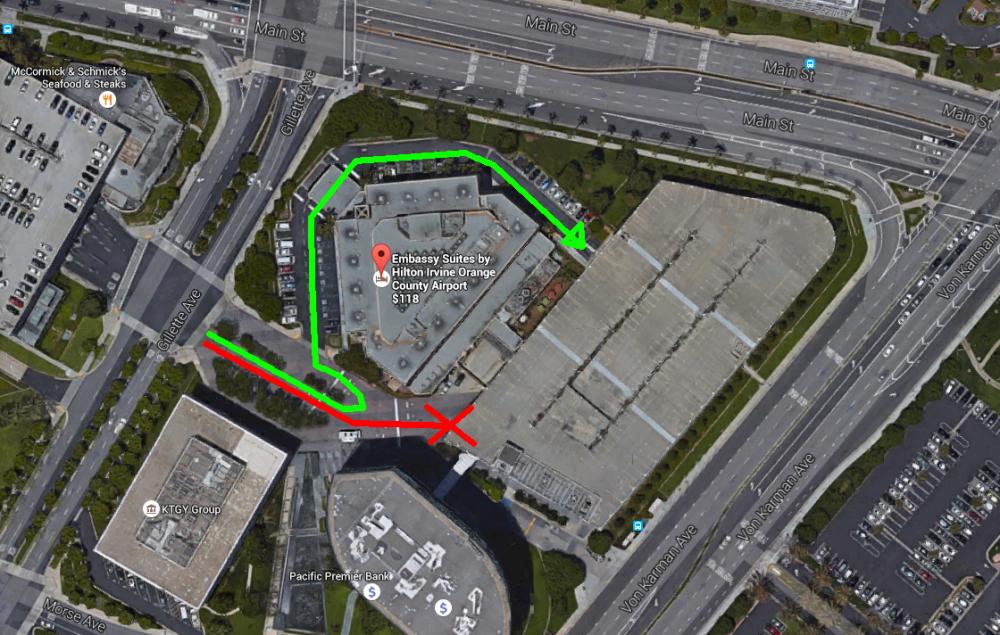
Alright here are a couple diagrams for how parking will hopefully work. When entering in by making a left on Gillette Ave, do not go straight into the parking structure as the hotel does not validate parking in that area normally. Make a U-turn and then a right into the Embassy Suites parking lot and then continue along the path until reaching the lower entrance. The tickets from this lot can be validated by the one who booked the hotel room though this lot is small and fills up fast. I am unsure about how lenient the hotel will be with giving out their validations if the number of cars being asked for goes over a certain point, but if the lower structure becomes full they have allowed validated parking in the upper levels. If for some reason you are not able to get validation then it'll probably cost 15 dollars here or at the structure on the other side of Gillette. For anyone planning on staying multiple nights I highly suggest parking here. If things do actually overflow and the ones who do not get validation do not want to pay, there is a large structure right across Von Karman Ave that does not have a pay station at the front or permit requirement. I have parked here before when going to visit someone at St Jude Medical Center for the day since the surrounding parking areas are usually packed and nothing bad happened. I have not, however, left my car in the structure overnight so do so at your own risk.
-
Oh yeah that's what I mean. Active Flow is a resource that would contribute to potential damage though I guess instead of resources/confirms/etc I should just say conditions. You won't have AF all the time, you won't always get a CH/FC for the extra 10%/20% and whatnot. In Tsubaki's case I can't say that she won't have charges all the time because she really does get them like nothing in CF, so having slightly lower unconditional chargeless damage does not bother me one bit. As for 236D, it did not feel faster to me when I was messing around, but if the startup only changed slightly it could be hard to tell.
-
See, I think that the potential for damage if you have the right resources or get the right confirm is great especially with the damage multipliers in the new system mechanics, removal of SMP combo timer reduction, and increased base damage of stuff. I don't think that you can just randomly into damage anymore if you spend nothing but that could change as people figure more things out.
-
Considering how easy charges are to get in this version, I wouldn't say her damage is that low if you compare it to other characters. Her chargeless damage is only slightly lower than what she was getting in CPEX and her damage with multiple charges seems greater.
-
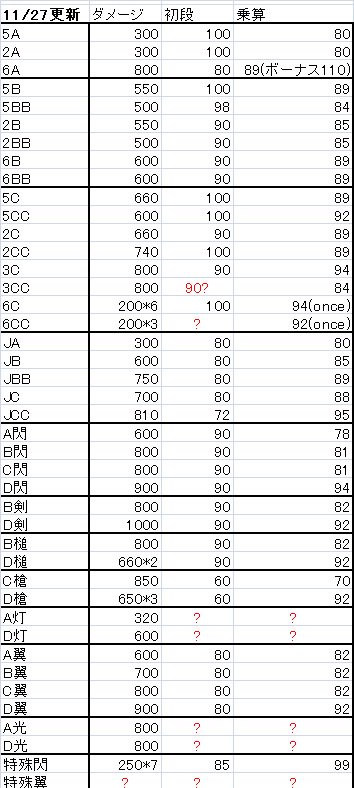
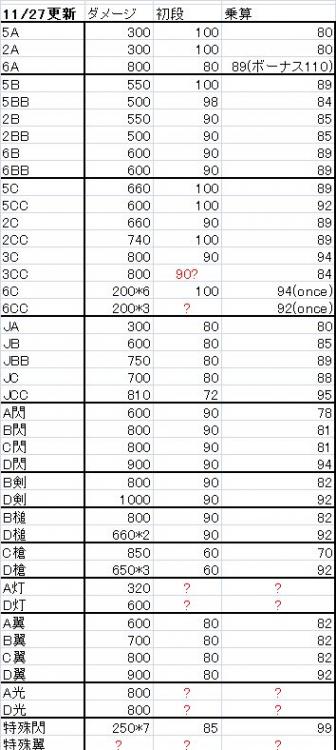
Incomplete damage and proration table
-
Mash A is what I do and it works sometimes.
-
Gotta admit that being able to pick up with 2A after j.236A > j.214X is pretty cool. I thought you'd only be able to do it off of starting with 623C, but you can do it in the air as well. Don't have to spend a stock to continue an air combo on the ground anymore.
-
I may be mistaken, but I am pretty sure the damage numbers stayed red during a CH when I played. I can just double check next time or just from match videos.
-
Well it increases the combo damage by 20% so there's at least that.
-
Oh cool I had been trying to figure out what the new FC was. So now her three are 6A, 3C(C), and 5CC.
-
It hasn't changed I am pretty sure. If you get a CH with it close range and go into 6BB, you can followup with 236A midscreen since 6BB will bounce them up a bit before sending them away if I remember correctly. No longer will you have to actually confirm into 5A after 6B hahaha. I don't think it is fast enough to be used as a poke.
-
Tap charge rate is doubled so 0.2 per tap. Charge cancelling normals and specials yield 0.25 and 0.5 respectively just like before. In the process of finding out held charge rate from shakycam recording. 2C lost its ridiculously long head invuln. She can now be hit by air moves in the recovery of 2C so oh well. Still no crossup hitbox on any of her air normals. Tested this thoroughly, but I didn't expect much. 22B/D can be easily mashed out of by AA-structured jabs, but that is to be expected. 22D moves Tsubaki quite the distance forward and will make upbackers block in the air as it has an actually decent hitbox structure. Very very fun to use after doing ghetto 421A projectile pressure reset at the right distance since Tsubaki's leap will bring her back into the opponent's face. Ending with standard followup 22B out of a BnB allows you to catch forward roll with 2A/2B if you don't charge cancel the ender. I would suggest not doing so most of the time since she is rolling in charges compared to her CP iteration. You can cancel j.236D into j.D after floating a bit and j.D has almost no landing recovery.